
![How to Build Immersive-AR Web Applications [Vue.Js and Three.Js WebXR]](/blog/content/images/size/w2000/2021/06/Nicoblue.png)
WebXR Tutorial Introduction
In this guide, I will show you how to create an immersive-ar web-based application. The app’s purpose is to create an augmented reality experience so that users can drop models to a scene. The user is also able to select a model from the scene and rotate or delete it. To begin with, I'd like to point out the relevant limitations of the app. To create a WebXR app, you will need a device that supports AR. You can find a list of Android devices provided by Google that support WebXR via Chrome 81+ here. In case you are an iOS user, you will need to download WebXRViewer, which allows you to create and run augmented reality experiences.
What is augmented reality?
Definition (Wikipedia):
“Augmented reality (AR) is an interactive experience of a real-world environment where the objects that reside in the real world are enhanced by computer-generated perceptual information, sometimes across multiple sensory modalities, including visual, auditory, haptic, somatosensory, and olfactory.”
This means augmented reality overlaps virtual objects (3d models) created by a computer into the real world, allowing it to interact with one another. Ikea place, is the perfect example for this.
What is WebXR?
Definition (WebXR)
“WebXR is an API for web content and apps to use to interface with mixed reality hardware such as VR headsets and glasses with integrated augmented reality features. This includes both managing the process of rendering the views needed to simulate the 3D experience and the ability to sense the movement of the headset (or other motion-sensing gear) and provide the needed data to update the imagery shown to the user.”
Meaning that WebXR will provide the necessary functionalities to build the immersive-ar web application, mixing both the virtual and real world.
WebXR Device API advantages:
- It 's free to use.
- It doesn’t require to install apps in Android (though iOS users will need to download WebXRViewer).
- An immersive-ar experience can be easily integrated with your web application.
- WebXR Device api is a product of the Immersive Web Community Group which has contributors from Google, Microsoft, Mozilla and others. Top developers from mentioned companies joined Mozilla to create WebXR Device API, giving support to their respective browsers.
WebXR Device API limitations:
- The heavy models require significant bandwidth.
- Being groundbreaking as it is, it is still under development and some features haven’t been launched yet.
- Apple has not announced its stand towards giving WebXR support in Safari yet. So for now, iOS users will have to download WebXRViewer, and this may cause different behaviours such as not displaying alerts or error messages on console.

What is Three.js?
Definition (Three.js)
“Three.js is a cross-browser JavaScript library and application programming interface (API) used to create and display animated 3D computer graphics in a web browser using WebGL”
Three.js will be responsible for loading, creating, and modifying our scene and relating it to virtual objects.
Three.js advantages for WebXR: It’s built on JavaScript.
- It has great documentation with plenty of examples.
- Three.js is supported by almost all Web browsers.
- It doesn’t require any third party plugin to run the code.
The Project
Is session supported
From now on, I'm going to focus on WebXR, Three.Js and how they communicate with Vue.js. In my example, I'm using WebPack, Three.js 0.125 and Vue.js 2.6.12. I also have a .js file for the Session (WebXR), .js file for the Scene(Three.js) and .js file for the Loaders (Three.js loader).
To begin with, you will need a simple HTML page that will only have a div with an id, which will be the entry point for Vue.js. You will need to define an entry function checkXR() to identify if the user’s browser supports WebXR and also a helper function checkSupportedState() to check for support of an immersive-ar session.
export async function checkXR() {
  xrButton = document.getElementById('xr-button')
  if (navigator.xr) {
    await checkSupportedState();
    return sessionSupported;
  }
}

function checkSupportedState() {
  return new Promise((resolve, reject) => {
    navigator.xr.isSessionSupported('immersive-ar').then((supported) => {
      if (supported) {
        xrButton.innerHTML = 'Enter AR'
        sessionSupported = true;
        resolve();
      }else{
        xrButton.innerHTML = 'AR not found'
      }
    })
  });
}After creating the entry function checkXR() and checkSupportedState(), you should create a component that will be your Homepage to call checkXR() function. If the device supports immersive-ar, users will be able to continue.
Request Session
Now, it’s time to create a new page/component that will be where the user’s are going to be redirected if the immersive-ar session is supported. In this page/component, you are responsible for preparing the session and scene for user’s. Therefore a new function must be created to be called from the new component.
export function onButtonClicked() {
  if (!xrSession) {
    navigator.xr.requestSession('immersive-ar', {
      optionalFeatures: ['dom-overlay'],
      requiredFeatures: ['local', 'hit-test'],
      domOverlay: {root: document.getElementById('app')},
    }).then(session => onSessionStarted(session), onRequestSessionError)
  } else {
    xrSession.end()
  }
}In onButtonClicked(), you should request the session from the browser specifying the required and optional features. You will use “local” reference space *1, which fits if the user isn’t expected to move much and “hit-test” to find intersections between a ray and real word surfaces. You can also request a DOM overlay, which puts the application into an immersive full-screen mode. If you decide to request DOM overlay you should add a domOverlay feature and specify which HTML element will be. requestSession() is asynchronous, so you should pass in success and error callbacks.
*1 reference space - Reference space describes the coordinate system for a specific tracked entity or object within the virtual world using a specified tracking behavior.
Session started
function onSessionStarted(session) {
  xrSession = session
  session.addEventListener('end', onSessionEnded)
  // create a canvas element and WebGL context for rendering
  let canvas = document.createElement('canvas');
  gl = canvas.getContext('webgl', { xrCompatible: true })
  // here we ask for viewer reference space, since we will be casting a ray
  // from a viewer towards a detected surface. The results of ray and surface intersection
  // will be obtained via xrHitTestSource variable
  session.requestReferenceSpace('viewer').then((refSpace) => {
    session.requestHitTestSource({ space: refSpace }).then((hitTestSource) => {
      xrHitTestSource = hitTestSource
    })
  })
  session.requestReferenceSpace('local').then((refSpace) => {
    xrRefSpace = refSpace
    // start WebXR rendering loop
    session.requestAnimationFrame(onXRFrame)
  })
  session.updateRenderState({ baseLayer: new XRWebGLLayer(xrSession, gl) })
  //initialize three.js scene
  initScene(gl, session)
}When the session starts you will have to create a <canvas> element and a WebGL context used to create the XRWebGLLayer. This is an interface between WebXR devices and WebGL context. You will also need to ask for “viewer” reference space, and with this ref space you will request hitTestSource since you will be casting rays from a viewer towards a detected surface (the results of a ray and a surface is an intersection). Furthermore you’ll also need to ask for a “local” reference space to be able to compare the position and orientation of a viewer related to local (where the session was started) position and orientation. While you request “local” reference space, you must have called session.requestAnimationFrame(animationFrameCallback) which will be the responsible for schedules a callback to be executed the next time the browser is ready to paint the session's virtual environment to the XR display. In addition, you’ll need to call the updateRenderState() method of the Session to schedule changes to be applied to the active render state prior to rendering of the next frame. Finally you should include callbacks functions to be executed when the session ends, and don’t forget to call a function that will put Three.js in use and initialize renderer, scene and camera.
Init scene
Scene initialization should have a basic scene setup with camera, scene and renderer. Of course you are able to add scene lighting or ambient lighting. Besides scene basic setup, you’ll have to create and add a reticle to the scene, but set its visibility to false. You’re going to use this reticle to identify surfaces using rays/hitTest (i’m going to cover this point later), to show the user where objects are going to be placed. Finally, if you decide to use DOM overlay, you might want to distinguish events behaviour from the scene/session with events related to your DOM overlay. So you should add an eventListener of “beforexrselect” to the clicked HTML element. If the application calls preventDefault() on the event, the WebXR “select” events are suppressed for the duration of this interaction.
Renderer configuration should be something like this:
renderer = new THREE.WebGLRenderer({
    antialias: true,
    alpha: true,
    autoClear: true,
    context: gl,
    canvas: gl.canvas
});After your scene initialization is done, you must create a component that will be responsible to call your onButtonClicked() function from the session to request and start the session/scene. You should call onButtonClicked when the component is mounted.
Each frame refresh
Until this point, you have your web application with an immersive-ar session and a three.js scene running. Now it’s time to make sure your scene is updating correctly. How will you do this? Well, on your onSessionStarted function you’ve called onRequestAnimationFrame(animationFrameCallback), this function will be called again and again with each frame refresh function. So you must implement that session loop callback function.
function onXRFrame(t, frame) {
  let session = frame.session
  session.requestAnimationFrame(onXRFrame)
  if (xrHitTestSource && modelLoaded != null) {
    // obtain hit test results by casting a ray from the center of 	//device screen into AR view. Results indicate that ray intersected with //one or more detected surfaces
    const hitTestResults = frame.getHitTestResults(xrHitTestSource)
    if (hitTestResults.length && modelLoaded != null) {
      // obtain a local pose at the intersection point
      const pose = hitTestResults[0].getPose(xrRefSpace)
      // place a reticle at the intersection point
      reticle.matrix.fromArray( pose.transform.matrix )
      reticle.visible = true
    }
  } else {  // do not show a reticle if no surfaces are intersected
    reticle.visible = false
  }
  // bind our gl context that was created with WebXR to threejs renderer
  gl.bindFramebuffer(gl.FRAMEBUFFER, session.renderState.baseLayer.framebuffer)
  renderer.render(scene, camera)
}As I told you before, onXRFrame() is the place where you keep the code that should run in each frame refresh. Eg, update reticle position depending on the surface detected. To do this, you should ask the actual frame to getHitTestResult using the xrHitTestSource you requested onSessionStarted. Hit testing is the process of finding intersections between 3D geometry and a ray, which consists of an origin and direction. frame.getHitTestResults(xrHitTestSource) will return an array of intersections between your ray and the detected surfaces (sorted by distance). If hitTestResults contains intersections, you should take the pose. Pose represents translation and rotation of the device relative to WebXR space origin, and is updated every frame to catch for the device movement’s. Pose’s information can be used to start adding augmented 3D objects to the scene. Now that you have pose information, it’s time to update reticle matrix position with pose transform property, which provides the position and orientation of the pose relative to the base XRSpace. Don’t forget to set reticle visibility to true. If hitTestResults is empty, you should hide the reticle from the scene. Finally, you will bind your previously created canvas buffer into three.js renderer and draw the scene updated.

Loaders
Now that you’ve a reticle with his position updating every frame with device movements, it’s time to place 3D objects into the scene. In order to place a model you should first load the model. 3D models are available in several file formats, each with different purposes and complexity, three.js provides many loaders. For this immersive-ar web application I'm going to use the .glb format that is well supported. .glb includes meshes, materials, textures, skins, skeletons, animations, lights and cameras. You might go to the Sketchfab site where you can find gltf files and convert them to .glb. You will need to import GLTFLoader from ‘three/examples/jsm/loaders/GLTFLoader.js’
export function loadModel(objectModel){
  return new Promise((resolve, reject) => {
    var loader = new GLTFLoader();
    loader.load(objectModel.model, (gltf) => {
      gltf.scene.scale.set(objectModel.scale, objectModel.scale, objectModel.scale);
      gltf.scene.name = objectModel.id;
      gltf.scene.userData = {
        productId: objectModel.id,
        modelFile: objectModel.model,
      }
      setModelLoaded(gltf.scene);
      resolve();
    }, (onProgress) => {}, (error) => {
      reject(error);
    });
  })
}Once you’ve imported GLTFLoader, you should make a new instance of GLTFLoader and call the .load() method. This method should receive a string containing the path/URL of the .glb file, onLoad callback function and optionally onProgress and onError callbacks functions. onLoad function will be called after the loading is successfully completed (this function receives the loaded JSON response returned from parse), onProgress (optional) function will be called while the loading is in progress and onError (optional) function will be called if an error occurs during loading. In your onLoad function, feel free to set any properties of your model. In the example, I've set scale, name (with the product ID I've received) and userData which is an object that can be used to store custom data about the Object3D. You should save gltf.scene in a variable to later be able to use it and add that model to the scene when and where the user wants.
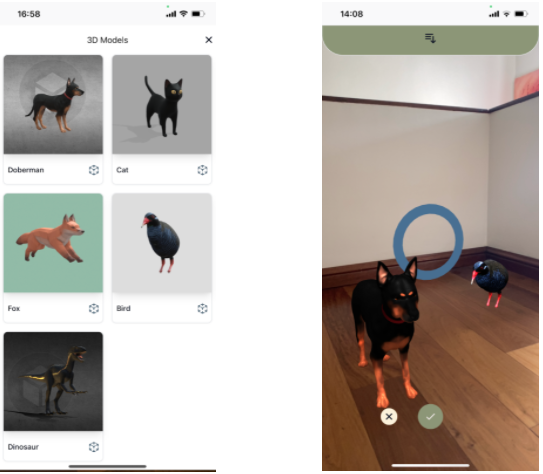
Furthermore, users should be able to decide which 3D object they want to place on the scene. To achieve this, you will need a component that will show a variety of 3D objects for example such as a catalogue where you show an image, name,etc of the model. In this model object you should have a property that refers to the 3D object file which you are going to use with the Three.js loader to load that model. This component could be hidden and only shown it if the user taps on the DOM overlay you define when you request your session. For example, I have a catalogue with an array of models and for each model I have a Model.vue component that will be responsible to call load() function from loader.js when the user taps to add that specific product. So make sure you have an image, button or something that will trigger load() function from loader.js.
Place objects
You already have a reticle and a model loaded in a variable prepared to be dropped into the scene, it’s time to create a button so user’s can confirm and place the object. I've added the button to the component I use to start the scene SceneHome.vue. This button must be hidden until the user selects a model to drop on the scene from the catalogue.
After you add your confirm button for the user, you should add an event listener for that button on the scene. This will make sure that when the user presses the button, you are going to place the 3D object loaded and store in your global variable you define on load() function from loader.js, with the position and orientation of the reticle that it is being updated every frame.
On your initScene() function add:
let checkButton = document.getElementById('checkButton');
checkButton.addEventListener('click', placeObject);Now, you have to create a placeObject() callback function. This function should be outside the initScene() function.
function placeObject() {
  if (reticle.visible && modelLoaded) {
  modelLoaded.applyMatrix4(reticle.matrix);
  scene.add(modelLoaded);
  modelsInScene.push(modelLoaded);
  window.eventBus.$emit('modelAddedToScene', {id: modelLoaded.userData.productId});
  renewModel(modelLoaded.userData.productId, modelLoaded.userData.modelFile, modelLoaded.scale.x);
  }
}It’s really important that you check if reticle is visible Also check if you have something on modelLoaded variable, this will avoid errors related to trying to place a model that is not loaded or trying to access properties of something that is null. The visible reticle means that we have a Hit-Test result where the user wants to place the 3D object. As i told you before, i’m going to use reticle orientation and position to place 3D objects, so in this function, I’m going to set 3D object position with modelLoaded (variable where you should save you gltf.scene) .applyMatrix4(reticle.matrix) with our reticle matrix. After setting the matrix, you are able to add this 3D object to the scene and you could store all 3D objects on the scene in an array (this will be really useful for selecting 3D objects from the scene later). In addition, after you place a 3D object you might want to automatically prepare and load the same 3D object so the user is able to drop as many objects as he wants. To accomplish this feature, you must load the same mode again with gltfLoader.
Eventually, you might want to communicate between your scene and your vue.js application. I chose eventBus because it’s really easy. After you add your model to the scene, you can emit an event telling vue.js that a model (3D object) has been added to the scene and you can send anything relevant for you.
As you emit an eventBus from scene.js, in some component you should be listening for that event.
window.eventBus.$on('modelAddedToScene', (data) => {
      //Do anything you need after a model is added to the scene
      //data.id have the id of the model that was to the scene.
})On the SceneHome.vue component, I've included the listening of the eventBus. Feel free to do anything you want, remember you have an object data with the model id to identify which model was added to the scene.
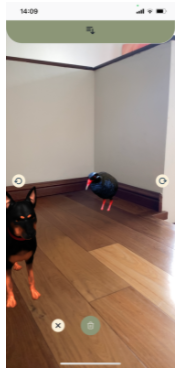
Selecting objects
Now that you are able to place 3D models on the scene, it’s time to allow users to select models from the scene and do anything they want with them, like delete or rotate them. To achieve this feature, you will need to use Raycaster from Three.js. Raycaster is similar to HitTestSource I’ve used with WebXR to detect intersections with real world surfaces. It will cast a ray with a specific origin and direction to check if that ray intersects with a 3D object from the scene.
To begin with, you’ll need to start listening to the “select” event from the session. This event “select” is triggered by the session after one of the session's input sources has completed a primary action. If you want to read more information about primary actions from XRSession tap here. A common primary action is users pressing triggers or buttons, tapping a touchpad, etc. So, to your onSessionStarted() function add the event listener and of course, create a callback function for the event.
xrSession.addEventListener("select", onSelectionEvent);function onSelectionEvent(event) {
let source = event.inputSource;
if (source.targetRayMode != "screen") {
return;
}
if(event.type === "select" && !isCatalogueOpen && !placeObjectButtons && !objectSelectedButtons && existModelsOnScene()) {
getModelOnSelect();
}
}In this example, I'm going to cast a ray from the center of the camera straight forward. This will avoid needing anything related to the event, because I’ll be able to ask the scene camera for the world position and direction. Another approach could be to cast a ray from the center of the camera to where the user has pressed on the screen.
export function getModelOnSelect() {
  var _raycaster = new THREE.Raycaster();
  _raycaster.set( camera.getWorldPosition(), camera.getWorldDirection() );

  const intersects = _raycaster.intersectObjects( modelsInScene, true );
  if ( intersects.length > 0 ) {
    let object = getOriginalParentOfObject3D(intersects[0].object);
    if(object != null) {
      if(targetObject != null) {
        cancelTargetObject();
        setObjectSelectedButtons(false);
      }
      object.translateY(0.1);
      targetObject = object;
      modelLoaded = null;
    }
  }
}As I explained above, You’ll need to create a new Three.js raycaster with the camera world position and direction. After creating the raycaster, you have to call the intersectObjects function. This is a method of the raycaster that will check all intersections between the ray and the objects. Whose parameters are the objects to check for intersections with the ray and a boolean that refers to making recursive the method (will check specified objects and also all descendants).
intersectsObjects() method will return an array of intersection points. Inside the intersection point you will have access to the property object referring to the object that the ray intersects with. When I explained how to load 3D objects, I mentioned that 3D objects are made of meshes and each mesh is an object, so when the ray intersects with an object, it will probably be a mesh and not the object itself that you should store on your variable modelsInScene array. The getOriginalParentOfObject3D() function will have the responsibility to look for the original parent of the mesh that the ray has intersect.
function getOriginalParentOfObject3D(objectParam) {
  let founded = false;
  let parent = null;

  while(!founded) {
    //Keep moving to object parent until the parent of the object is       //Scene. Scene parent is null

    if(objectParam.parent.parent === null) {
      parent = objectParam;
      founded = true;
    }else{
      objectParam = objectParam.parent
    }
  }
  return parent;
}This function will receive the first intersection that intersectObjects returns. So, you should iterate over and over until you find the object whose parent is the Scene. As the scene parent is null, you should keep looking until object.parent.parent is null (object.parent is the scene). Once you have returned the original 3D object, you are able to do any modification you want such as delete or rotate them. In my example, I translate the object along the Y axis to create the experience for the user that the object selected lifted off the ground. I also store that selected object in a global variable so that the user is able to later rotate or delete that object.
Conclusion
As I mentioned at the beginning of this guide, my goal here was explaining some WebXR and Three.js core concepts, so some code was omitted. Anyway, the full source code of this example can be found on Github.
Now yes! You have an Immersive-ar web application that can track device position, detect surfaces performing hit-test, place 3D objects into the scene, select and modify models from the scene connected with vue.js through eventBus.
Despite being a young and new technology, you’ve just read and discovered how powerful it can be. WebXR device API popularity is increasing at high-speed, allowing developers to easily build immersive-ar app’s for at least most devices and browsers, delivering a unique simplification that has the potential to become really valuable for developers, and of course, for XR tech general consumer use. I can only imagine what’s yet to come!
A unique and best solution does not exist, both immersive-AR and native AR applications are extremely powerful. You have to study which solution will adjust better to your project.